(Reading time 4 minutes)
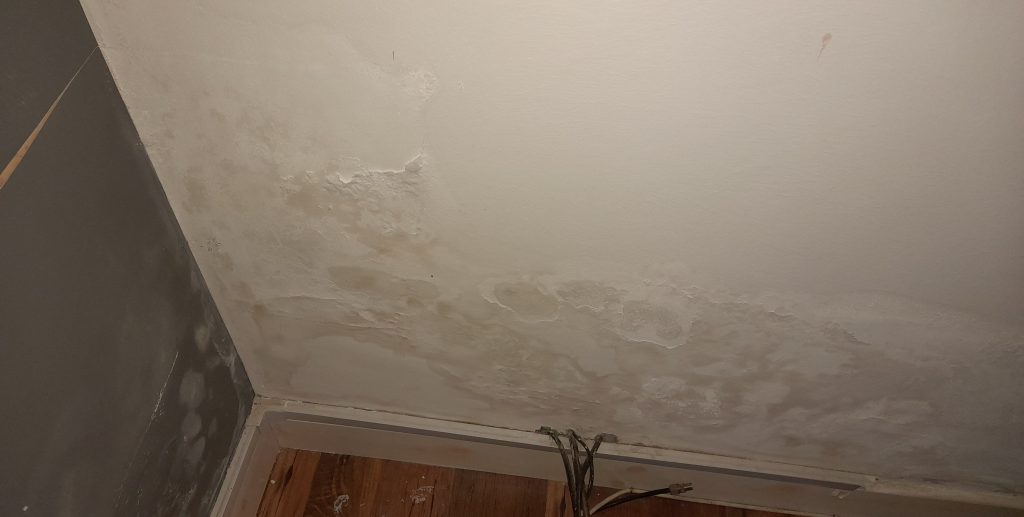
A damp patch on a wall is a common, unwelcome problem that many homeowners face, especially in winter.
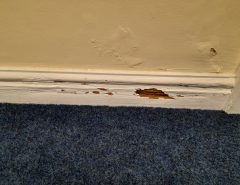
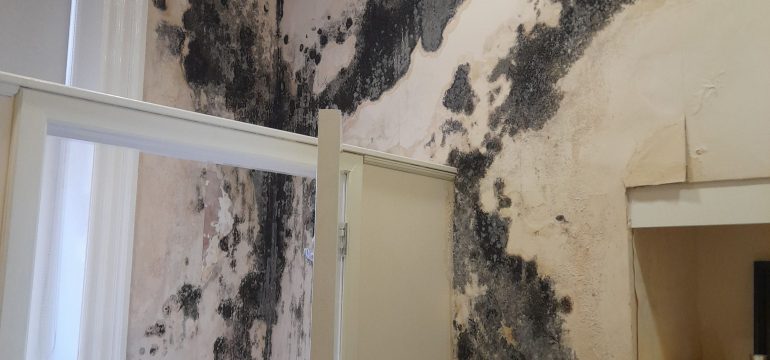
They usually start as a small stain or soft spot, but can often lead to musty smells, peeling paint and deteriorated plasterwork. If left untreated, damp walls can lead to unpleasant living conditions, black mould and even cause timber to rot and lose its structural integrity.
It is important not to just paint over the damp problem; you must first understand what is causing the damp problem before drying out the walls sufficiently.
When masonry is saturated, it takes several weeks, not hours, for moisture trapped within the masonry to fully evaporate. This requires a reasonable temperature and good ventilation to remove the moisture, otherwise it can appear elsewhere as condensation.
Here is how you can take control of the drying process and ensure your home returns to a healthy, dry state, ready for redecoration.
The first step: Identify the underlying source of moisture
The most important step to take to dry out your walls long-term is to identify the source of the damp problem and prevent it from returning.
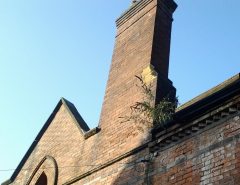
Painting over damp will not solve the problem for long. You must first understand if the moisture is caused by penetrating damp, condensation, or rising damp, or if the problem is originating from a plumbing leak or a faulty appliance, such as a washing machine or dishwasher. Leaks often originate from adjacent properties or from external building defects.
There are telltale signs of damp which can be used to identify the problem inside your home, and often these only require minor repairs to remedy the problem rather than specialist damp proofing.
If you are unsure of the type of damp, you may benefit from a professional damp survey by a qualified surveyor. They will provide you with a full survey report of any damp found, along with recommendations to solve the issue long-term.
Once the type of damp has been identified and remedied, efforts can then be made to dry out damp walls.
Improving the airflow
Before you plug in a dehumidifier, you have to ensure damp can freely evaporate from the wall and then be ventilated out of the property.
If you have a sofa, a wardrobe or a bookshelf pushed up against the damp area, move it away from the wall to promote air flow.
Ideally, you want at least a foot gap between the wall and any furniture.
This allows for increased circulation, preventing the air between the furniture and the wall from becoming stagnant and damp, which can encourage mould growth.
Opening Windows and Doors
An easy way to help remove moisture from the home is to open windows and doors, allowing trapped moisture to escape. The problem with this is that damp walls often occur during winter, and occupants may not want to leave their property open to the elements, especially with the cost of heating a home. But a quarterlight ajar is often sufficient.
Drying out Damp Walls with a Dehumidifier
Another way to increase air circulation is by using a dehumidifier. They can be used to remove excess moisture from the internal atmosphere, helping dry out walls that are no longer susceptible to damp problems.
There are two main types of dehumidifiers you’ll encounter:
- Compressor dehumidifiers: These work by blowing air over a cooling coil to condense airborne moisture into water droplets that drip into a container or a draining hose. They are highly effective in warm, humid rooms.
- Desiccant dehumidifiers: These use a chemical absorbent to soak up water from the air. They are much more effective in colder environments (like a chilly basement or a house in winter) where compressor models might struggle.
A humidifier dries the air, not the wall, allowing moisture on the damp wall surface to evaporate. It can also help draw any trapped moisture within the masonry to the surface, although this will take much longer if the masonry is saturated.
To maximise efficiency, keep the windows and doors of the affected room closed while the dehumidifier is running, so you are only drying out that air. Remember to empty the water tank regularly, as the dehumidifier will turn off when full, or use a continuous drainage hose if your model supports it.
Dehumidifiers are only a viable option for isolated areas within the home, and only when the root cause of the damp problem has been addressed. They can also be energy hungry, meaning an increase in your electricity bills.
Why Turning Up the Heating Can Damage Walls
It is a common misconception that cranking up the heat is the best way to dry a house. While warmth does help moisture evaporate, unless there is adequate ventilation to help remove the moisture, it will simply remain trapped within the property.
If you turn a room into a sauna, you risk damaging structural timber, warping floorboards or causing the surface of the plaster to dry too quickly and crack.
The goal is a steady, moderate temperature of around 18–22°C.
Speed up drying with a fan
As water evaporates from a damp wall, improved air circulation can help speed up the process.
Standard household pedestal fans on ‘waft’ function can help move air and force evaporation at the surface. But remember ventilation must be increased to provide the evaporated moisture with somewhere to escape the property. Running a fan and a dehumidifier in tandem will provide the fastest results.
Moisture Absorbers
Moisture absorbers may be beneficial when placed in cupboards or drawers, but will quickly become saturated and require drying in an oven. Moisture absorbers will not provide the required absorption for damp walls. Moisture absorbers should be avoided as there are much more cost-effective ways to dry out internal walls inside the home.
Cold Bridging and Improving Ventilation
Often, walls become damp because they are a cold spot, and warm, moisture-laden air from within the home condenses on them. This is known as cold bridging and can lead to mould growth on the surface of the wall. The masonry inside may be bone dry, as the moisture remains on the surface. This indicates a problem with condensation, and improvements to ventilation (eg, using extractor fans or PIV units) can help remove excess moisture from the atmosphere, while thermal improvements to the wall can prevent cold spots.
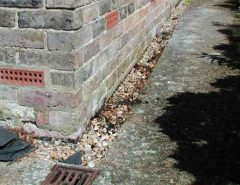
Make sure airbricks are not blocked, as they provide airflow into the subfloor voids, helping the drying process. Often, airbricks and wall vents are covered up and filled in to prevent draughts, but they are essential in maintaining an optimum internal environment and reduce the risk of fungal decay.

Why do wall materials dry at different rates?
Walls can be built from different materials that have different drying rates, which depend on their capacity to hold moisture. Understanding the properties of your specific wall materials can help you take the right action to dry them out as quickly as possible.
It’s also worth noting that not all types of damp will saturate masonry completely. Penetrating and rising damp may cause the masonry within a wall to become damp, whereas a condensation problem will only affect the plaster and wallpaper. This makes it important to understand the type of damp causing the problem.
- Wallpaper: remove if damaged
Most modern wallpapers have a vinyl coating that acts like a plastic wrap, sealing the moisture inside the plaster. Damp will also cause wallpaper to become saturated with moisture, which can make it deteriorate and peel away from the wall. If this is the case, removing the wallpaper will help the plaster dry out.
- Plaster: remove if blown
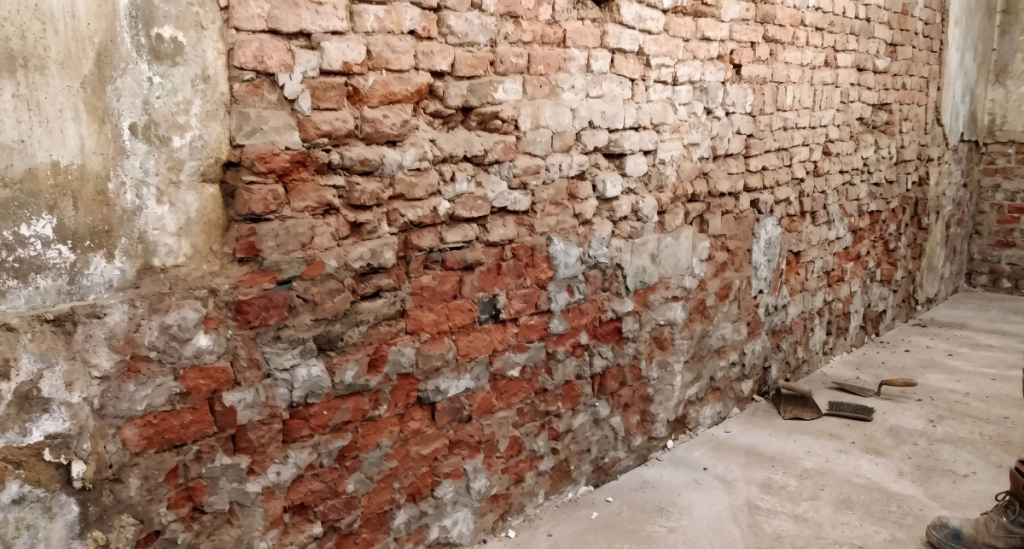
If the plaster sounds hollow when tapped, it has likely “blown”, meaning it has pulled away from the brickwork or breeze blocks, and moisture vapour could remain within the gap. Strip the damaged plaster back to the bare brick or block to allow for the masonry within to dry out properly. For rising damp, a salt-resistant plaster may be required to prevent further salt contamination.
- Plasterboard: replace rather than repair
Modern plasterboard absorbs water easily and can wick moisture. Once wet, the gypsum core can weaken into mush. It is often faster to remove and replace damp sections, once the original reason for the dampness has been addressed.
- Solid brick and masonry
Solid brick walls in older buildings are dense and can absorb water from the ground, while building defects can cause moisture to penetrate through the masonry. Typically, solid walls can dry at a rate of around an inch per month, suggesting a standard 9-inch wall may take up to nine months to dry naturally. This can be aided with increases to ventilation, heating and the use of dehumidifiers.
- Salt Damp
If rising damp is the cause of damp, moisture can carry groundwater salts upwards into the wall. These salts remain after drying and absorb moisture back into the plaster. To prevent this, the contaminated plaster will need to be removed, salt-resistant render applied, and the wall allowed to dry fully.
- Lath and plaster: the hidden cavity trap
Lath and plaster, common in older homes, uses thin wooden strips (laths) covered with lime or gypsum-based plaster. Moisture can be absorbed by the timber and collect in the voids behind the plaster if ventilation is inadequate.
- Stone walls: the slow movers
Stone walls (limestone, sandstone) are the hardest to dry as they release moisture slowly. If the wall consists of outer blocks and a rubble-filled core, these can retain moisture for long periods of time, which can lead to inconsistent drying.
Stone walls need to dry out slowly, as rapid drying from high heat or sealing with modern waterproof renders can cause surface flaking or crumbling mortar.
Damp Walls Returning? You May Require a Damp Specialist
If you have attempted to dry out damp walls, and the problem is persisting, you may need professional assistance to address the root cause of the issue.
Bubbling plaster, persistent damp patches or tidemarks that keep returning could suggest damp proofing is required, which always starts with a professional damp and timber survey from a qualified surveyor.
At Peter Cox, our damp proofing specialists diagnose the source of moisture through a thorough inspection of the outside and inside of your property, aided by professional equipment such as moisture meters, hygrometers and thermal imaging cameras to determine the source of the moisture and offer targeted repairs.If your property is showing signs of wet walls, persistent damage or unexplained damp patches, arrange a survey by contacting us today.