
Discovering discolouration, peeling paint, or water damage overhead is an alarming sight for any property owner. A damp ceiling is not merely a cosmetic issue that can be painted over. Left unmanaged, prolonged dampness can travel through your ceiling joists, compromise plasterboard integrity, and create an ideal environment for fungal decay and persistent black mould growth.
When moisture appears above your head, taking prompt action is essential. Identifying the exact cause of the moisture is the first step toward fixing the issue permanently, protecting your home’s structural stability, and securing a healthy living environment.
Why Am I Getting Damp on My Ceiling? (Primary Causes)
When property owners ask why dampness is forming overhead, the answer typically falls into one of three primary categories:
1. Roof Defects and Weather Ingress
If the ceiling affected sits directly beneath a loft space or a flat roof, external rainwater penetration is a primary suspect. Slipped roof tiles, cracked slates, defective lead flashing around chimneys, blocked valley gutters or sun-cracked roofing felt allow rainwater to enter the roof structure. Water runs or drips into the roof space, soaking insulation and then the plaster ceiling, producing localised damp patches. Quite often the water pulls dust from the loft through, and a dark ring appears.
2. Hidden Plumbing Leaks
If there is a bathroom, shower room, water tank, or pipework situated above the affected ceiling, an internal plumbing fault may be the cause. Escaping water from deteriorated bath or shower silicone seals, leaking radiator valves, or loose waste pipe connectors can pool on floorboards and seep through into the ceiling space below. Walk-in showers or shallow shower trays can be an issue, as the waste connections are difficult to install in the tight space and can leak later.
3. Ceiling Condensation and Cold Bridging
Ceiling dampness is not always caused by liquid water leaking from above. High indoor humidity combined with poor loft insulation can cause condensation to form directly on the room side of the ceiling plaster. When warm, moist air created by daily activities rises and meets a chilled ceiling surface, airborne water vapour condenses into liquid droplets, and condensation is formed. If a section of insulation is missing, the mould patch will often have straight sides or if at the edge of a ceiling, there will be clear spaces corresponding to the joists.
Why Is There a Damp Patch on My Ceiling But No Leak?
Homeowners often express confusion when a damp patch appears on a ceiling despite there being no pipework overhead and no signs of roof damage, leading to the query: why is there a damp patch on my ceiling but no leak present?
This phenomenon is almost always caused by thermal or cold bridging and inadequate loft insulation. A thermal bridge occurs where an area of the building fabric allows heat to escape much faster than the surrounding insulated structure.
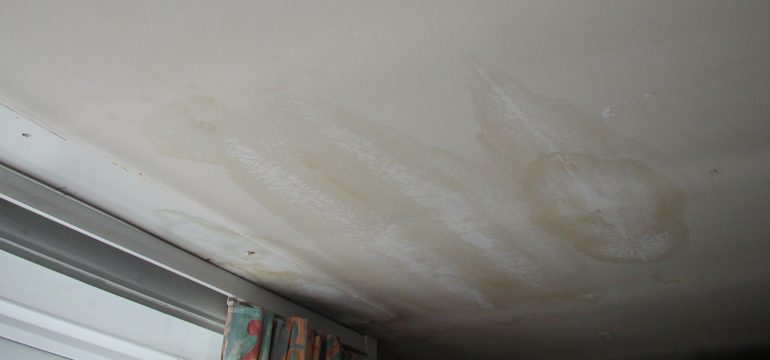
In a loft space, if insulation has been disturbed, pushed aside, or is missing above a specific area of the ceiling, that section of plaster becomes significantly colder than the rest of the room. As warm, moisture-laden air rises during daily living, it contacts this localised cold spot. The air rapidly cools below its dew point, causing invisible water vapour to condense onto the plasterboard. Over time, these recurring condensation spots create dark, damp patches that resemble a water leak. Depending on the severity of the issue, the dark area will either be covered in mould or will attract dust from the air and stick it to the surface.
How to Tell the Difference: Leak vs. Condensation
Distinguishing whether a wet patch on a ceiling is caused by an active leak or internal condensation is essential before attempting repairs:
Plumbing or Roof Leaks
- Visual Appearance: Leaks typically form distinct, localised damp patches with yellowish or brownish “tide mark” rings around the margins as the plaster dries and re-wets.
- Physical Texture: The plaster can soften, but will only sag if the leak soaks large areas and the weight of water brings the plasterboard down.
- Consistency: Plumbing leaks produce continuous moisture regardless of weather, while roof leaks expand and darken specifically during and after rain.
Condensation
- Visual Appearance: Condensation manifests as scattered, dark, speckly black spot mould patches or surface “sweating” (tiny water droplets sitting on the paint finish).
- Location: It tends to cluster in poorly ventilated room corners, along perimeter ceiling edges directly beneath cold eaves, or in bathrooms and kitchens.
- Seasonality: Condensation is highly seasonal, worsening during winter when heating is turned on and windows remain shut. However, mould stains the surface, so if it is not cleaned off, the stain will make you think the mould, and therefore the condensation, is present all the time.
How to Fix a Damp Ceiling (Step-by-Step)
Fixing a damp ceiling requires a structured repair approach to ensure the issue does not return:
Step 1: Eliminate the Moisture Source
You must first fix the primary cause of the moisture. This involves replacing slipped roof slates, clearing blocked gutters, resealing shower trays, fixing plumbing leaks, or improving room ventilation to control humidity. Attempting to repair the ceiling before stopping the water source will result in immediate failure. For plumbing leaks, the first action is to turn off the mains water supply, if safe to do so. Feed to boilers should always be considered, though most will automatically turn off if the supply is interrupted.
Note: If you notice a ceiling sagging significantly under the weight of trapped water, avoid poking large holes recklessly, as this can cause the plasterboard to collapse. Instead, place a large bucket underneath and carefully make a tiny pilot hole in the lowest point of the bulge using a small screwdriver to release water pressure safely.
Step 2: Dry and Treat the Area
Allow the ceiling structure to dry out completely using steady background heat and commercial dehumidifiers. Ensure adequate ventilation to prevent condensation from forming. Once dry, wash down any mould patches using a specialist fungicidal wash to kill dormant mould spores embedded within the plaster and remove the stain.
Step 3: Repair and Stain Block
Lightly sand any damaged plasterwork or flaking paint. Apply a dedicated stain-blocking primer over the discoloured tide marks; standard emulsion paint will allow water stains to bleed back through. Finish with two coats of high-quality paint.
How to Prevent Dampness on Ceilings Long-Term
Preventing ceiling dampness from returning relies on simple long-term building maintenance habits:
- Top Up Loft Insulation: Ensure loft insulation is laid evenly across the entire ceiling area to a depth of at least 270mm, eliminating cold spots and thermal bridges. Keep insulation clear of eaves vents to maintain loft airflow. Do not insulate under the water tank.
- Install Continuous Ventilation: Run humidistat-controlled extractor fans in bathrooms and kitchens to capture excess steam at the source before it builds up and causes condensation issues.
- Maintain Low Relative Humidity: Avoid drying wet laundry indoors on radiators, keep pan lids closed while cooking, ensure adequate background ventilation, and maintain a consistent low background heat during winter to keep ceiling surfaces warm.
How Peter Cox Can Help
Accurately diagnosing ceiling moisture requires specialist expertise to ensure you do not spend money fixing a roof when the issue is internal condensation. Peter Cox has decades of experience in diagnosing and resolving damp and condensation issues across UK properties.
Our team of qualified damp and condensation specialists holds benchmark industry accreditations, including CSTDB (Certificated Surveyor of Timber and Dampness in Buildings) and CSRT (Certificated Surveyor in Remedial Treatments) qualifications. We utilise non-destructive diagnostic tools, such as thermal imaging cameras and electronic moisture meters, to trace moisture pathways and measure surface temperatures without damaging your decor.
Whether your home requires structural damp proofing, loft insulation adjustments, or energy-efficient ventilation systems, our recommended treatments are backed by long-term property guarantees for total peace of mind.
Conclusion
Fixing damp on ceilings requires identifying whether water is entering from above via a leak or condensing from below due to high humidity and cold surfaces. By addressing the original moisture source, improving insulation, and maintaining adequate ventilation, you can protect your ceiling joists and keep your living spaces dry and healthy.