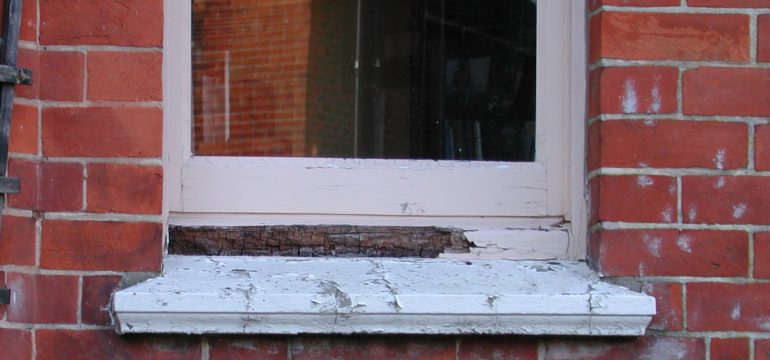

Wooden windows bring undeniable character, warmth, and period charm to any property. However, because they bear the brunt of the unpredictable British weather, wooden window frames and sills are particularly vulnerable to timber decay.
Discovering soft, peeling paintwork or soft, crumbling timber around your window frames is a common frustration for property owners.
It is easy to treat a decaying sill as a minor cosmetic annoyance, but it is best not to ignore this.
If left untreated, timber decay will destroy the frame, and if moisture is able to penetrate inside the building, it could cause further issues internally to the surrounding wall framing and floor joists.
Moisture can also damage window frames internally when rainwater penetrates inside, or because of condensation.
Catching moisture decay early is vital to prevent structural damage and avoid the expense of a full window replacement.
What is Wood Rot and What Causes It?
Wood rot is a biological form of decay caused by specialised wood-destroying fungi. Airborne fungal spores are naturally present in the environment and land on wooden surfaces all the time, completely harmlessly, unless the wood is damp.
However, these microscopic spores germinate, produce hyphae (crude roots), and begin to feed on the organic wood fibres when the timber’s moisture content is above 18%.
The fungal hyphae excrete enzymes that digest the cellulose or lignin that give timber its strength, and the wood will lose its structural integrity.
What Are the Main Types of Wood Rot?
Fungal decay in building timbers falls into two categories: brown rots and white rots. Each will alter the physical appearance and density of the wood differently:
1. Brown Rot (Including Dry Rot)
Brown rot targets the cellulose within the wood structure. As it feeds, it causes the timber to shrink rapidly, turn a deep brown colour, and split into distinct cube-like fractures across and along the grain.
The most notorious form of brown rot is Dry Rot (Serpula lacrymans). Dry rot is particularly dangerous because it can form root-like strands that transport moisture across non-timber surfaces, such as masonry and plaster, allowing it to spread far beyond the initial damp window sill into adjacent wall framing. Generally, dry rot will not grow on the outside, where it is too wet and cold, but will spread away from the gentle damp to reach inside timbers.
2. White Rot
White rot breaks down both the cellulose and lignin within the wood. Because it digests the lignin as well, the decaying wood takes on a bleached, pale, or yellowish appearance. As white rot progresses, the timber loses its structural density and feels spongy, soft, or stringy and fibrous when pressed. It is frequently found in exterior timber exposed to persistent rainwater or condensation.
How to Spot Wood Rot Around Windows: The Warning Signs
Identifying timber decay can be done by carrying out both visual and physical inspections. When examining your window sills, frames, and sashes, look out for these clear visual warning signs around your window joinery.
Key Visual Indicators
- Cracked or Peeling Paintwork: Flaking, blistering, or micro-cracks in the paint film allow rainwater to soak directly into bare wood while trapping moisture beneath.
- Persistent Condensation Pooling: Water droplets running down the inside glass pane and pooling in the putty line or on lower sills create a permanent damp zone that triggers spore germination.
- Swollen, Sticking Sashes: Timber expands as it absorbs water. If your wooden sashes suddenly stick, jam, or become difficult to open and close, elevated moisture levels are present.
- Fungal Growth: The presence of visible white cotton-wool-like strands, grey fungal mats, or mushroom-like fruiting bodies on lower sills indicates advanced, active decay.
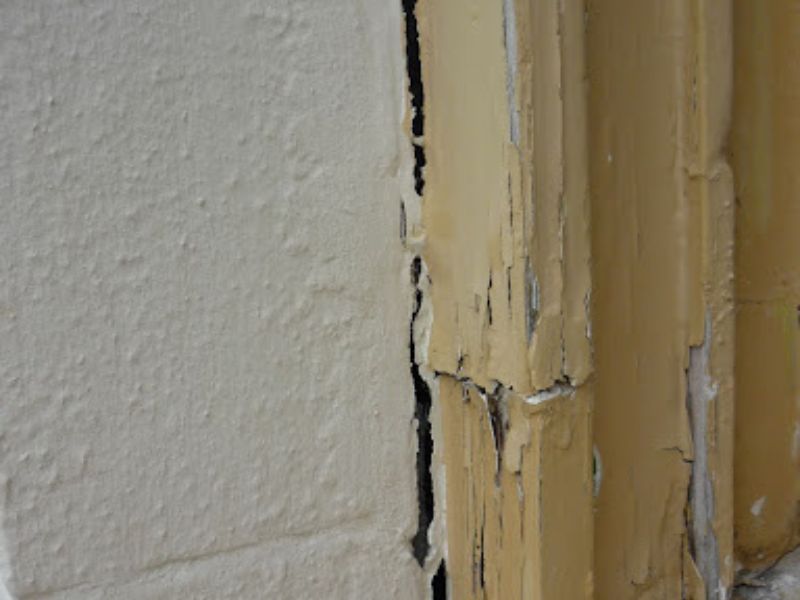
Testing with a Screwdriver
To test the structural integrity of the timber frame of your window, you can take a fine flathead screwdriver and gently press the tip into lower window sills, corner joints, and bottom frame rails.
On sound timber, the metal tip will meet firm resistance and bounce off the surface.
If the screwdriver sinks easily into the wood with little force, or if the timber hollowly yields and crumbles away, the wood fibers are compromised and active decay is present.
Can Wood Rot Be Fixed?
The short answer is yes, rotted wood can often be repaired, provided the decay is caught early and has not undermined the load-bearing capacity of the surrounding structure. Deciding whether to repair or replace comes down to the extent of the damage:
Repairing Minor Decay
If the decay is localised to a small area, such as an isolated section of an external sill or a corner joint, full replacement is rarely necessary. The rotten material can be cut back and reconstructed using sections of pretreated timber, specialist two-part exterior epoxy resins or heavy-duty wood hardeners.
Full Replacements
If the decay is severe, widespread, or has structural implications for the surrounding masonry, simple repairs will fall short. When the rot has caused the loss of structural integrity for the entire depth of the sill or spread into the underlying wall plates, lintels, or surrounding timber wall framing, timber splicing or full window replacement is required to protect the building’s structural integrity. Just remember that windows often provide structural stability to surrounding masonry, and removing them can cause masonry to fall without warning.
Does Home Insurance Cover Window Wood Rot?
Unfortunately, standard home insurance policies almost always exclude wood rot. Insurers view fungal decay as a result of gradual wear and tear, lack of routine maintenance, or prolonged exposure to weather, rather than a sudden, accidental event. This makes proactive maintenance and early repair essential.
How to Repair Wood Rot on Windows: A Step-by-Step Guide
For minor, non-structural decay on window frames and sills, executing a meticulous timber repair using professional materials will restore the strength and appearance of your joinery. Follow this step-by-step guide:
Step 1: Scrape Away Decayed Wood
Using a sharp chisel, scraper, or rotary tool, carefully scrape away all crumbly, soft, or discoloured rotten wood. You must continue scraping past the visible rot into sound, dry, solid timber.
Step 2: Apply Wood Hardener & Fungicide
Once the cavity is clean, free of dust, and completely dry, treat the bare timber. Saturate the exposed wood fibers with a dedicated liquid chemical wood hardener and high-performance fungicidal wood preservative. The liquid hardener soaks deep into soft, porous fibres to bind them together, while the fungicide kills off any microscopic fungal spores lingering deep within the grain.
Step 3: Rebuild with Epoxy Resin or Wood Filler
Mix a two-part exterior epoxy resin or heavy-duty wood filler according to the manufacturer’s instructions. Epoxy resins are superior to standard fillers because they flex naturally with seasonal timber movement and bond permanently to raw wood. Press the mixed resin firmly into the treated cavity, using a putty knife to build up the material slightly higher than the original profile of the sill or frame.
Step 4: Sand, Seal, and Paint
Allow the resin or filler to cure completely. Sand the area flat using medium-to-fine sandpaper until the filled cavity sits flush with the surrounding timber profile. Dust down the surface, apply a high-grade wood primer, seal all perimeter joints with flexible exterior caulk, and finish with two coats of high-quality, weather-resistant exterior gloss or microporous paint.
How to Prevent Wood Rot on Windows
Preventing timber decay from returning relies on simple, routine maintenance habits that stop water from lingering on your joinery:
- Routine Paint Maintenance: Inspect window frames annually for minor paint cracks or flaking and exposed bare wood. Touch up damaged paintwork immediately to maintain a watertight protective barrier.
- Maintain Exterior Caulk Joints: Keep the perimeter sealant joint between the wooden window frame and the external brickwork in good condition. Perished or missing caulk allows wind-driven rain to enter directly into hidden wall cavities.
- Clear Window Drip Grooves: Ensure the small drip groove cut into the underside of external sills remains clean and free from paint build-up or dirt. This groove breaks the surface tension of rainwater, stopping it from running back toward the masonry wall.
- Select Rot-Resistant Timber for Replacements: If replacing entire sills or sashes, choose naturally durable or pre-treated timbers.
Professional Timber Treatments by Peter Cox
While minor surface repairs on window sills are suitable for competent DIYers, there are clear limits when structural timber has been compromised.
You may need to seek professional advice when:
- Decay has traveled past the window frame into internal wall joists, lintels, or floor timbers.
- You are dealing with Dry Rot (Serpula lacrymans) that requires timber replacement and potentially masonry sterilisation.
- The property is a listed building, is in a conservation area, or is a period home that requires specialised sash window preservation techniques and listed building consent.
A damp and timber survey from a professional and qualified surveyor can help provide answers and next steps.
Why Choose Peter Cox?
Peter Cox is the UK’s market leader in property preservation and timber decay treatments.
Our network of local surveyors hold industry-recognised CSRT and CSTDB credentials, ensuring an accurate diagnosis of your timber issues and the damp that often causes the problem.
When treatments are required, our professional timber treatments are typically backed by long-term, transferable guarantees, giving you absolute confidence that your property is secure long term.
Worried that wood rot around your windows has spread into structural framing? Book a professional timber survey with Peter Cox today to protect your property.